S.P.R.K. Controller

Introduction
At the beginning of the SPRK project, we needed to build a fully custom controller specific to the socket protocol we were creating. Thus, the controller was born.
Other Projects
This controller was also used in another capstone project to control their robot. The same socket control scheme was used.
Development
The controller was built with C# and WinForms in Visual Studio.
The Socket Protocol
The socket protocol mainly uses string manipulation to determine what the robot is trying to convey. For example, if we wanted to tell the robot to enable into the telop mode, we would execute this handshake:
1
2
DS    -> "tele"            // controller requests teleop from the robot
ROBOT -> "[STATE] TELEOP"  // Robot confirms the new state back to the DS
DS is short for “Driver Station” and is a synonym of controller. The same terminology is used in FRC.
State Changes
The controller will not change state unless the robot tells it to do so. When a button is pressed on the controller to change state, the controller sends a packet with the desired state and nothing else. Only when the robot replies with the new state does the controller apply the new mode. This contrl scheme is useful when for example, there is no autonomous routine selected. The robot can choose to not enable, and can instead throw error telemetry. This means the robot controls its own enable state, though it will never enable without first being prompted.
The controller will only send joystick data in the
teleopstate. This is important for the heartbeat.
Initializing the Connection
When the robot connects to the controller, some data is exchanged between the two. Here is an example of said data:
1
2
3
4
5
6
7
8
9
DS Connects...
ROBOT -> "[STATE] DISABLE" // Send an initial state to the DS
ROBOT -> {"
    [ROBOTINFO] Build date: ... Blah blah robot information
    [SIG][AUTONS]my_cool_auton,my_coloer_auton,third_auton
    [SIG][FLAGS]sim,camera,
"}
DS    -> "init DS_DATA"
ROBOT -> "Recieved Driver Station info: DS_DATA"
The [ROBOTINFO] prefix denotes what is displayed in the info box. The controller populates its auton dropdown based on the information given from [SIG][AUTONS]. There are two available flags:
simcamera
The camera flag tells the controller to enable the camera stream option, allowing the driver to enable, disable, and view the camera. The sim flag tells the driver station whether it is a simulated robot or not. All it does is add a prefix to the status text (eg. display SIM-TELEOP instead of TELEOP). 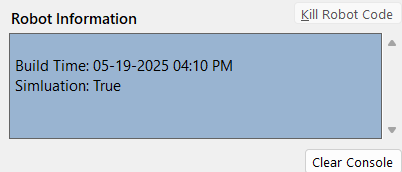 View of the “Robot Information” box on the controller
Other Features
“Heartbeat”
For SPRK, if no data is recieved over a certain time interval while enabled in teleop, the robot will automatically disable for protection. This isn’t a true heartbeat, as there is no separate data sent specifically for the heartbeat. The “heartbeat” is also not exclusive to joystick data, but can be any data whatsoever.
 Message from the robot when no data is sent in Teleop
Camera Stream
The camera is enabled and disabled through the socket, but the actual data is transferred over HTTP via the mjpeg-streamer package for debian. The controller launches an Edge webpage via the WebView class and connects to the camera’s HTTP stream.
Selecting Autonomous routines
At connection time, the robot informs the controller of the available autonomous programs using the CSV format. 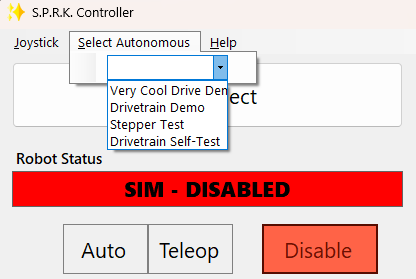 The autonomous selector dropdown As soon as any option is picked, the DS will send the name of the routine prefixed by
 se-auto to the robot.
More Improvements
As I revisited the project, I realized there were a few improvements that could be made to the controller:
- I didn’t have a joystick at the time, so I replaced the bypass feature with a toggle between the keyboard and a real joystick.
- I revised some of the protocol to be more robust and easier to parse.